1- Backup procedure
I - Controller backup to the SD memory card using front switches
II- Controller backup to the SD memory card using the program
III- Controller backup to a backup file using Sysmac Studio
IV- Exporting backup file using Sysmac Studio Offline.
2- Restore procedure
I- Restoring backup from SD memory card using front switches
II- Restoring backup from the SD memory card using the program
III- Restoring backup from a backup file using Sysmac Studio
3- Backup file content
_______________________________________________________________________________________________________
1- Backup procedure
This operation generates a Backup.dat file and 2 .ini files
Insert the SD card and make sure that the SD PWR LED lights (valid card).
I- Controller backup to the SD memory card using front switches and the push button.
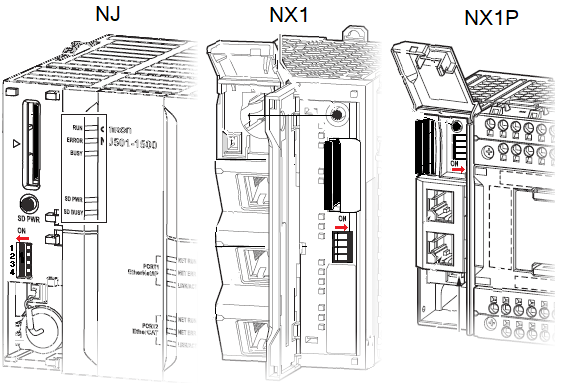
1. Set the DIP switch 3 to ON (tother switches set to OFF position).
2. Press the push button for 3 seconds.
3. During the transfer, the SD PWR LED flashes for 3s-0.5s.
4. The SD PWR LED lights at the end of the transfer.
5. Set switch 3 to OFF.
Note: This opreration can be prohibited from the securty settings using Sysmac Studio.
II- Controller backup to the SD memory card using the program and system-defined variables
1. Set to ON the system-defined variable _Card1BkupCmd.ExecBkup.
2. The _Card1BkupSta.Active flag is set to ON during the transfer
and the _BackupBusy flag is set to ON.
3. The _Card1BkupSta.Done flag is set to ON when the transfer is complete.
In case of error, the _Card1BkupSta.Err flag is set to ON.
III- Controller backup to a backup file using Sysmac Studio
1. From the Tools menu, select Backup Controller ...
2. Select the path and a name for the backup file.
3. Select items to include in the backup file.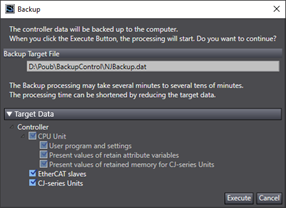
4. Clic on the Execute button.
5. During the transfer, the SD PWR LED flashes for 3s-0.5s.
6. The SD PWR LED lights at the end of the transfer.
IV- Exporting backup file using Sysmac Studio Offline
1. From the Tools menu, select Export backup file ...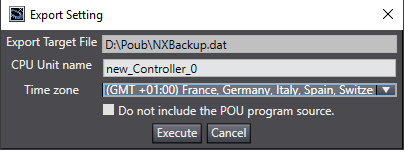
2. Then the backup file can be sent by email to the Person in charge to restore the file using a SD memory card.
2- Restore procedure
I- Restoring backup from SD memory card using front switches
1. Insert the SD card into the controller slot
2. Make sure the SD PWR LED is lit (valid card)
3. Place the Backup.dat file in the root of the SD card
The option IpAdr=Yes/No in the RestoreCommand.ini* file allows you to choose whether or not to transfer the IP parameters.
The option variable=Yes/No in the RestoreCommand.ini* file allows you to choose whether or not to transfer the retained variables.
4. Turn off the controller power supply
5. Set switch 3 and 4 to ON and all others switches to OFF
6. Restore the controller power supply
7. During the transfer, the SD PWR LED flashes 3s-05s
8. The RUN LED flashes 0.5s-0.5s
9. The SD PWR LED lights at the end of the transfer
10. In case of error, the ERR LED lights and the RUN LED goes off.
11. Set switches 3 and 4 to OFF.
II- Restoring backup from the SD memory card using the program
This operation should have been previously authorized in the basic parameters of the controller.
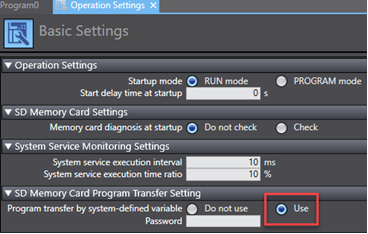
1. Place the Backup.dat file on the SD card. If it is located in a directory, specify the access path (e.g.: repA/repB) in the _Card1PrgTransfertCmd.Dirname system variable.
Similarly, if a password has been entered in the Basic parameters of the controller, it must be entered in the _Card1PrgTransfertCmd.Password system variable.
The _Card1PrgTransfertCmd.TargetIPAdr system variable also allows you to overwrite the IP address, the mask and the gateway when it is ON.
2. Activate the _Card1PrgTransfertCm.Exec system variable
3. During the transfer, the SD PWR LED flashes 3s-0.5s
4. The RUN LED flashes 0.5s-0.5s
5. The SD PWR LED lights at the end of the transfer.
6. If an error occurs, the ERR indicator lights up steadily and the RUN indicator goes off.
For mode details, see manuel W501 section 9-5 Backup Function
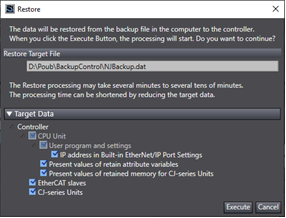
III- Restoring backup from a backup file using Sysmac Studio
1. Connect Sysmac Studio to the controller
2. From the Tools menu select Backup then restore
3. Select the Backup file
4. Select the items to transfer (pay attention to the IP address)
5. Execute the transfer.
3- Backup file content
These files are created during the Backup operation allowing you to choose which elements to transfer when restore (or auto-transfer operation).
• User programs, variables and definitions of variable types (structures)
• EtherCAT configuration (slaves and master) *
• NX card configuration
• I/O mapping
• Name and configuration of the controller, Ethernet port, optional ports (NX1P)
• Motion configuration of axes, cams.
• Configuration of events, tasks, data recordings (trace)
• Configuration of EthernetIP exchange tables
• Configuration of the internal clock
• CJ card configurations
• Content of saved variables (including CJ typed variables)
• Absolute encoder position *
Note :
Some EtherCAT slave configurations cannot be saved in the backup and encoder position modified since the backup was executed (see W501 Backup Function sect 9-9-4).
Was this article helpful?
That’s Great!
Thank you for your feedback
Sorry! We couldn't be helpful
Thank you for your feedback
Feedback sent
We appreciate your effort and will try to fix the article