Introduction
This tutorial is designed to explain the transfer process of compact flash memory cards for CS1/CJ1 PLCs.
Saving configuration files / program on the CF memory card
There are several ways to create / save the configuration of an machine, either with or without using a PLC.
Method 1: "Backup" of machine using CJ1 / CS1:
- Insert the CF card
- Switch the switch 7 to ON
- Press MCPWR for 3 seconds
- When the transfer finishes, LEDs Busy and MCPWR turn off
- Switch the switch 7 to OFF
Method 2: With a different PLC and using CX-Programmer:
- From the CX-Programmer I/O editor table, add the cards corresponding I/O to the desired configuration and then move the table in the PLC. The transfer is possible in only two cases: - The actual configuration of PLC I / O is identical to one created. - The PLC is equipped with no map I / O and has no table I / O recorded.
- Insert a CF memory card
- Run a backup as described above
Method 3: Using CX-Simulator instead of a PLC:
- Run CX-Simulator
- Open the memory card manager
- Make a copy-and-paste of the data files involved with the renaming as described in the table below.
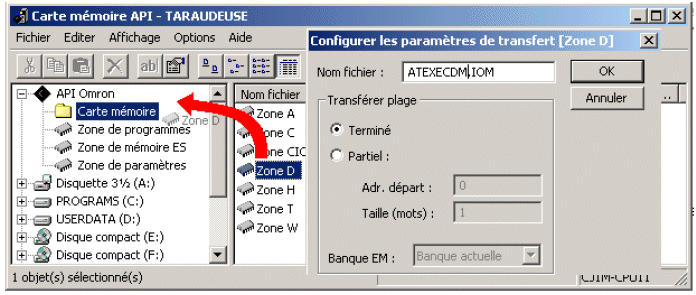
- Then copy the files from the virtual memory of the PLC to a CF card:
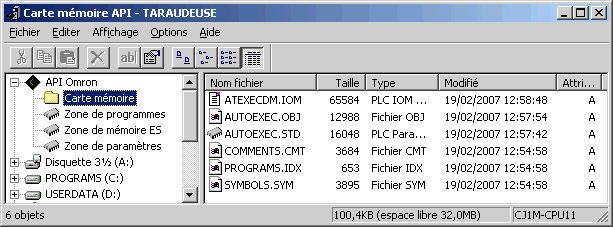
Method 4: With CX-Programmer only (without PLC):
- Insert a CF card into the appropriate drive of the PC
- Run CX-Programmer
- Right click on the PLC, select from the context menu ... Forward. To file.
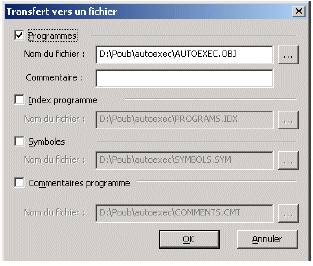
- Copy / paste the generated files into the CF memory card.
 |
Warning: This operation does not achieve all of the data (program and comments only). Automatic loading CF -> PLC requires several files (see next section "Automatic Transfer") |
Automatic transfer from CF card to the CJ1 / CS1 PLC
There are 3 loading procedures:
- RESTORE: To restore on power up all data previously saved by a backup
- AUTOEXEC: Used to load at power and selectively programs / parameters and partial memories
- REPLACE: Restore the Program alone on power up. Note: This function requires a CPU V2 or higher
| AUTOEXEC | RESTORE | REPLACE | Description | |
| Program | AUTOEXEC.OBJ | BACKUP.OBJ | REPLACE.OBJ | User program |
| Data | AUTOEXEC.IOM | BACKUP.IOM | DM special cards (D20000-D32767) | |
| ATEXECDM.IOM | BACKUPDM.IOM | DM users (D0-D19999) | ||
| ATEXECE*.IOM | BACKUPE*.IOM | EM memory bank (0 to C from the CPU) | ||
| BACKUPIO.IOR | CIO, WR, HR, AR, T / C val. Current | |||
| Parameters | AUTOEXEC.STD | BACKUP.STD | PLC Configuration, table I / O, routing tables, table data-link | |
| Special | BACKUP**.PRM | Data / maps specific program (Protocol macro, etc.). |
Key: The files in bold type are essential for the proper conduct of the proceedings. Non-bold filenames are optional.
Procedure for AUTOEXEC:
- Rename files necessary AUTOEXEC (retaining the extension) *
- Turn off the PLC
- Switch the switch 2 to ON
- Power on the PLC
- When the transfer is complete the LED Busy turns off
- Switch the switch 2 to OFF
Procedure for RESTORE:
- Turn off the PLC
- Insert the CF card in the PLC
- Switch the switch 7 to ON
- Turn on the PLC power
- When the transfer is complete, the BKUP LED turns off
- Switch the switch 7 OFF
 |
Note: If SW2 and SW7 is ON at power, the RESTORE procedure takes precedence over the procedure AUTOEXEC |
Procedure for REPLACE:
- Rename the file necessary REPLACE.OBJ
- Turn off the PLC
- Switch ON switch 2
- Turn on PLC the power
- When the transfer is complete the LED Busy turns off
- Switch OFF switch 2
Program hot transfer (from CPU-V3)
- Rename the program file (eg ABC.OBJ)
- Authorize this transfer by placing the word
A5A5inA651 - Specify the file name in the words
A654toA657(ex:4142 4320 2020 2020) - Force the bit
A650.15ON to execute the transfer
|
Note: At the end of the transfer words A650-657 and the bit A650.15 are re-initialized |
Was this article helpful?
That’s Great!
Thank you for your feedback
Sorry! We couldn't be helpful
Thank you for your feedback
Feedback sent
We appreciate your effort and will try to fix the article