Introduction
This tutorial is intended to give an overview of connecting CelciuXº to CP1L (serial CompowayF)
| Components used: • EJ1N-TC__-__ • EJ1C-EDU_-NFLK • 24 Volt Supply • CJ1W-CIF11 • CP1L and USB cable to program the PLC • E58-CIFQ1 for configuration of CelciuXº |
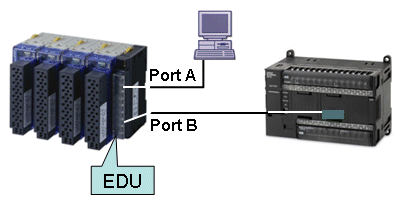 |
Procedure:
Assumption: CX-One with drivers for CP1L and EJ1 (CelciuXº) are on the PC
Assumption: CX-One with drivers for CP1L and EJ1 (CelciuXº) are on the PC
- Setting the CJ1W-CIF11: Set the dip switches as follows
SW2 Description 1 ON: Terminator connected. 2 ON: 2-wire method 3 ON: 2-wire method 4 Not used. 5 OFF: No RS control of RD (continual reception) 6 ON: RS control of SD - Connect the CJ1W-CIF11 (RS485 port) to the B port of the EDU.
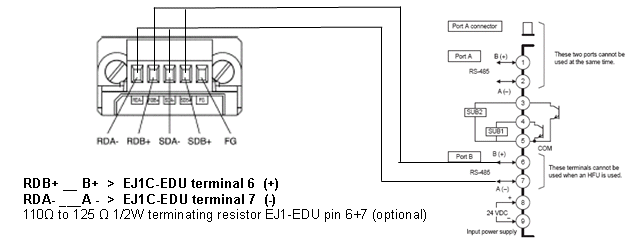
- (Optional) Connect EJ1 with PC / CX-Thermo with the E58-CIFQ1 cable and adjust the “Comm. Port B” settings, defaults are 9K6bps, 7-E-2
Assumption: CP1L is just out of the box and has its default settings. - Connect PC to PLC using a USB cable and create the network
a) Start CX-Integrator (new project) and select ‘auto on-line’
b) Select “USB connection” and click
c) Double click CPU port.. in left bottom window, select Port2 and CompowayF

d) Click [TRANSFER] select range 0 – 0 and Click [OK]
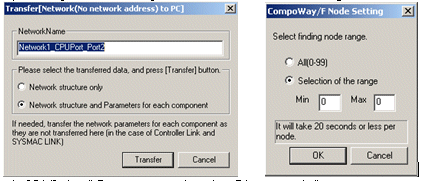
e) [OK] the “Cannot acquire the Slave node” message
f) Double click the PLC and make these settings: “PLC setup (custom)” and
“serial gateway”, the others should match the CelciuXº settings.
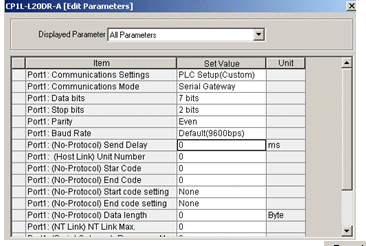
g) Transfer the new settings to the PLC with the 'Transfer PC to unit' button' > [YES] (PLC must be in Monitor or Stop mode!)
h) Right click “CPU port” and transfer [Network to PC], click [transfer], select a wider range which include the node numbers of the CelciuXº units.
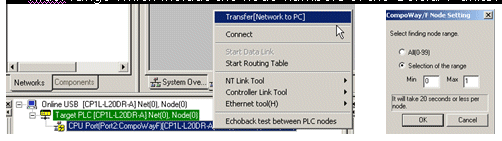
Network setup and connection complete. - Open CX-Thermo to set-up the CelciuXº Temperature Controller
Right click the TC unit, start dedicated tool, start with settings inherited
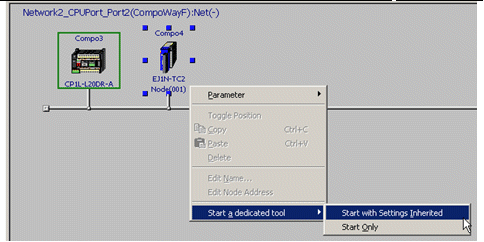
CX-Thermo starts with the correct TC unit template, don’t forget to upload the TC parameters from the TC unit first, if the TC unit is already configured!! - Example how to read some parameters from the CelciuXº into the PLC
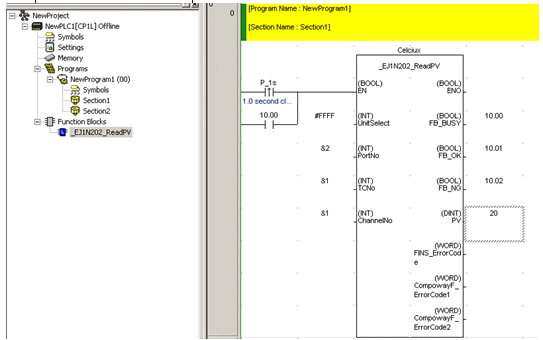
Workflow:
Open CX-Programmer from CX-Integrator and select “off-line” mode.
Insert the desired function blocks from the library (like the _EJ1N202_ReadPV)
Insert the function block in the ladder like in the example above
Note: (read the FB help file for details)
The UnitSelect should be set to #FFFF
When using the CPU-comms In the CJ1/CP1L-M: PortNo = &2
Set TCNo and ChannelNo according to need
PV gives the current measured value in the select TC# and Channel#
Note: Connection with CJ1 works exactly the same.
Was this article helpful?
That’s Great!
Thank you for your feedback
Sorry! We couldn't be helpful
Thank you for your feedback
Feedback sent
We appreciate your effort and will try to fix the article