Introduction
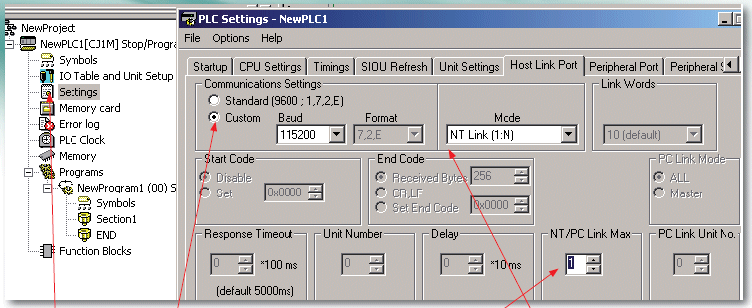
| 1 | Connect the communication cable between your computer and the CJ PLC. (Check that dipswitch 5 is in off position). |
| 1A | go online with the CJ1 PLC by using CX-Programmer and set the PLC in program mode (Ctrl+ ). |
| 1B | Double click on settings in workspace on left hand side of CX-programmer. If workspace isn’t shown, use Alt+ so workspace will appear. |
| 1C | Choose in the pop-up screen folder HOST LINK PORT to change the communication settings. |
| 1D | Select CUSTOM and change the BAUD to 115200 . (high speed), use for MODE the NT LINK( :N). |
| 1E | Set the NT/PC LINK MAX to value 1 , this is the number of nodes on NT/PC LINK network. Close pop-up screen and settings will save automatically. |
| 1F | Transfer the settings to the PLC by clicking the PLC tab in the top menu bar, choose TRANSFER -> TO PLC. (or use Ctrl+T), press enter to agree on transferring the settings |
| 1G | After transfer make sure that the CJ1 PLC is back in RUN MODE (Ctrl+ ) |
 |
Connect the communication cable between your computer and the NS Terminal. |
| Open an existing project or create a new project in CX-Designer. | |
|
Click on the PT tab in the top menu bar and chooses communication settings |
|
|
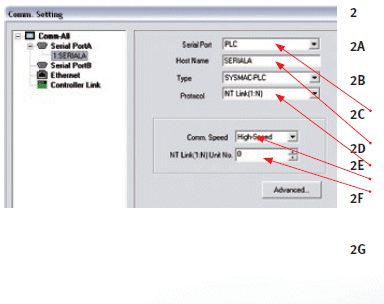
Expand Comm-ALL tab to reveal the various communication options. |
|
| Expand Serial PortA to reveal the serial port to PLC | |
| Select SERIAL Port to PLC, HOSTNAME to SERIALA, TYPE to SYSMAC-PLC and Protocol to NT LINK( :N). | |
| Set COMM. To High-Speed (baud rate 115200) NT Link(1:N)set to 0 (for only node on network NT Link (1:N). Save the settings by pressing the OK button. | |
|
Transfer the settings to the NS Terminal by clicking the PT tab in the top menu bar, choose TRANSFER -> Transfer [to PT] (or use Ctrl+B), and press YES to agree on transferring the settings.
|
Was this article helpful?
That’s Great!
Thank you for your feedback
Sorry! We couldn't be helpful
Thank you for your feedback
Feedback sent
We appreciate your effort and will try to fix the article